Toastmaster of Ceremonies
by Dr. Joaquin Ayala
Whilst recently doing a show for a local office of one of the Big Three automotive companies, I had decided to do Toastmaster from the Show Doctor book. After I got to thinking about it I had the idea of using a mirror goblet in this routine to change it up a bit and add some visual flair.
First you will need a mirror goblet or any sort of mirror glass, you will need one or both of the Double Shot gimmicks (for this description we will assume both will be used), a Water Pull gimmick (for this effect, a custom one which I will describe how to make later in these instructions), a 18” or 24” silk of any bright color, a rubber band and some orange juice*.
Set-up
The first thing you will need to do is to determine how much liquid your mirror goblet or glass holds. To do this, remove the lid from one of the shot glasses and fill it to minimum capacity** with orange juice, then pour that amount into one half of your mirror goblet. If the goblet is about ¾ full, then you need to split this amount between the two shot glasses. If not, fill the shot glass again to minimum capacity and pour that amount into the mirror goblet until you are about 3.81cm (about 1.5 inches) from the rim of the goblet. Once you have determined the final amount of liquid for the goblet, fill both shot glasses by splitting that amount evenly between the two of them and place the caps on the shot glasses. If you will be performing this regularly, after you have determined the amount your mirror goblet will hold without being too full, you can pour that into a measuring glass or cup and make note of how many fluid ounces it holds. This allows you to simply measure out the proper amount of liquid next time, and then fill the shot glasses.
Next you will need to fill one half of your mirror goblet with orange juice (as a reminder: the same amount as is in BOTH shot glasses together). We will call the side with liquid in it the ‘load side’.
Prepare the silk with the rubber band by rolling it for the pop production as found on pages 162-163 of the Show Doctor book. The version given in the book is a variation from Jeff on the Vito Lupo “Semi-Impromptu Silk Production” from Encyclopedia of Silk Magic, Volume 4, pages 1562-1564. I personally use a custom dyed silk that was dyed with saffron, but a bright yellow or orange silk would work best with this effect because it matches closely with the color of the orange juice, so the color of the liquid makes sense, but you can use any other bright color if desired.
Now you will to do some experimentation. You need to attach the water pull inside your jacket or vest so that it hangs out of view should you reach into the air with an open jacket/vest. It should also hang high enough off of the bottom hem of the jacket for the same reason, all of this whilst being easily accessible with normal actions during the routine. This ideal position will vary from reader to reader, so it is impossible for me to tell you where to pin it – that is for you, the reader, to find out. Which side you use (left or right) is also up to you. The rubber stopper for this goes into your lapel pocket, positioned near the top of the pocket off to the side in the upper corner.
Finally, you will need to position the shot glasses in your sleeves, one in the right sleeve and one in the left sleeve. Position the silk on the right arm for the production and you are set for performance.
Performance
 The mirror goblet can be on stage on a side table before the start of the show, or you can carry it out; either way take care that the empty side faces the audience. For the aforementioned show, I was hired to give a talk about productivity and connectivity in relation to customer service. After my intro I walked onstage to introduce myself and give a short preliminary speech, then went into the first part of the routine:
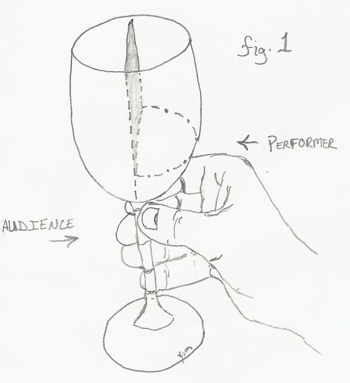
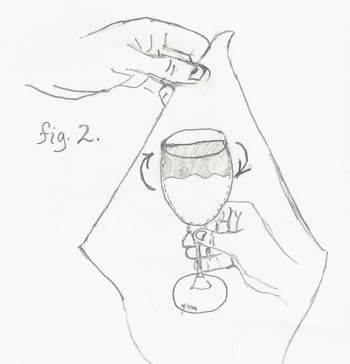
Pick up the mirror goblet with your left hand to make a toast and then pretend to notice that the goblet is empty. Fig. 1 shows a side view of the mirror goblet. Pause for a couple of beats as if trying to think of a solution, then produce the silk holding it at the fingertips for a moment to allow time for the effect to register. Glance at the empty goblet, and then back at the silk. Use the silk to cover the glass momentarily, turning the goblet under the cover so that the load side faces the audience (see Fig. 2) and whisk the silk away to produce a full glass of liquid. This should all take place within about one second; the left hand comes up to cover the goblet with the silk (all the while never really stops moving until after the production), the right turns the load side to the audience as soon as it is under cover, then the silk is whisked away. Thus, the production of liquid should look instantaneous. Once again, be sure to pause so that people can see what has taken place. To continue, place the silk into your lapel pocket as if it were a pocket square, raise the now filled goblet again, make the toast, take a sip and complete the first part of the routine.
 I will note that in this particular performance a short five minute video for the assembled mass followed, and prior to moving just off to stage left for the duration of this video, I left the goblet on the podium in view. After the video, I made a short presentation with some analogies tied together with some miscellaneous magic effects, then continued with the goblet (after taking another sip of juice):
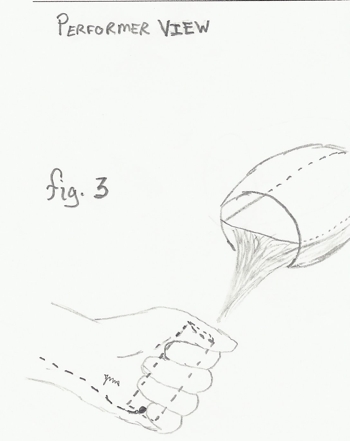
Reach inside your jacket for the water pull and position it with the opening facing the ceiling and positioned in your fist so that the open part is accessible through the hole formed by your index finger and thumb. Pick up the goblet and pretend to pour the liquid into your hand, really pouring it into the water pull. Be sure to keep the load side of the goblet toward the audience and the opening should be turned upstage slightly to help hide the upper edge of the mirror during the pouring action (see Fig. 3. Note the exaggeration of the angle of the goblet). Once the liquid is inside the pull tube, set the goblet down and reach for the silk in your lapel pocket, stealing the rubber stopper (or the threaded end cap) as you pull the silk from the pocket. Pretend to wipe up any excess liquid on the hand supposedly holding the liquid, and as you do, secretly push the stopper securely into the opening of the tube. This action is easy to cover with dabbing and wiping motions. Replace the silk in your lapel pocket for continuity (you can put it away elsewhere if desired), make your magical pass and show that the liquid has disappeared!
 As a side note: It was at this point that I asked for a volunteer from the audience (soon to become a participant!) to join me on stage. In this case, it was the President of the regional office whom I chose to pick because I noticed that he had a pocket square in his jacket that he was wearing. Once onstage, I asked him a couple of questions and afterwards, asked to borrow his pocket square. I had him examine it before continuing with the routine at hand.
Show the pocket square (or napkin, silk, or whatever you happen to use) on both sides and if there is more than one person nearby, have others examine it as well. Complete the routine by producing one shot glass with the pocket square, handing it to the V.I.P. and then stop for a beat. If they start to drink, have them wait for a moment as you produce the second shot so that you may join them in the final toast. If you used a borrowed item to produce the shot glasses, when you go to produce the second one, line the lid up with the one already there so that they are stacked one on top of the other. In this way, all that is required for clean-up is to palm off the lids together and return the borrowed item.
This routine can also be done with a milk pitcher to effect the eventual vanish of the liquid, but with that you have quite a large prop to lug around, and besides you lose the visual appearance of the liquid in the goblet. If you use a milk pitcher, it also eliminates the need for the water pull.
The Water Pull
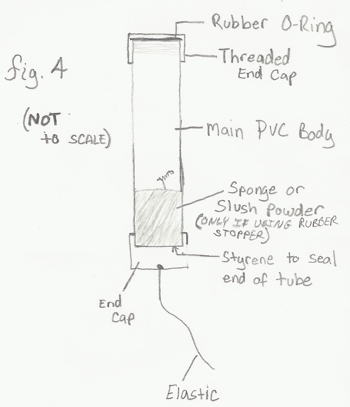 To make the water pull, you need a short piece of PVC pipe 6.35cm (about 2.5 inches) in length and 2.54-3.17cm (1 to 1.25 inches) in diameter (this is the main body), an end cap to fit over the end of that piece, a rubber stopper large enough to plug one end of the main body, a small piece of thin styrene sheet, superglue, PVC cement, black matte spray paint, a drill, a small piece of sponge,*** elastic cord, a safety pin, a piece of sandpaper (any medium grit will do), a pencil and an X-Acto or other sharp hobby knife. This sounds like a complicated project, but it really only took me about 10 minutes to complete it, not including drying time for the glues and the paint. It was also quite easy compared to how it looks. Fig. 4 is a diagram of the parts and construction of the pull.
Start by cutting the main body to size and use a file or sandpaper to de-burr the edges. Use the drill to drill two holes a short distance apart on the top of the end cap. Drill slowly to avoid heating and melting/warping the PVC. Use the sandpaper as best you can to smooth the outsides of the holes, on both the outside and the inside of the cap. The holes should be larger than the diameter of the elastic cord you choose to use. Next, use the main body piece to trace a circle in pencil onto the sheet of styrene. Use the hobby knife to carefully cut out the circle of styrene, and then use sandpaper to round out and smooth any sharp or non-round edges. The styrene piece, once cut out, should have the same outside diameter as the main body. Use the superglue to attach the styrene to one end of the main body and allow it to dry. After it is completely cured, test its watertight strength by filling the tube half way with water and cover the open end with one of your hands or the rubber stopper. Shake the tube; apply light pressure around the outside edges of the styrene. If no water gets out, you are good to go. Empty the tube.
Spray one layer of the matte black paint on the outside only and allow it to dry thoroughly. Measure a 30cm (about 1 foot) length of the elastic cord. Attach one end to the loop in the safety pin using a strong knot such as a square not or a surgical knot. Feed the other end through one of the holes in the cap starting on the outside, then up through the second hole. Again, finish by tying the end with a strong knot. Clean the inside of the end cap and one end of the main body on the outside as per the instructions on the PVC glue. Apply the glue as directed and place the end cap on the main body, but not all the way on, leaving a little gap between the cap and the styrene piece, allow it to cure completely; apply a single thorough coat of the matte black paint and allow it to dry thoroughly. The gap will facilitate replacement of the elastic cord in the future if necessary.
Cut a piece of super absorbent sponge in a rough circle a bit smaller than the inside diameter of the main body. Push the sponge to the bottom of the tube. If desired, place a second piece on top of that. This will hold the liquid you pour into the tube. Any bit of time required for the sponge to soak up all the liquid and hold it in suspension will be covered by pretending to wipe the excess liquid away with the silk. If you are using slush powder the same applies, more or less.
Check the rubber stopper for fit. It should be snug and require a little effort to remove it after use. You want it that way (or at least, presumably so) because that ensures that the stopper will stay put and no liquid remains will dribble out all over your costume or clothes. Check to make sure everything is watertight by pouring liquid inside the tube with the sponges or slush powder in place, putting the stopper in and jolting the unit a bit. Stretch the cord a little and allow it to snap back to rest position. If the stopper stays put and no liquid escapes, you have succeeded.****
Another idea: If you can find a tube of appropriate proportions with a threaded end that will accept a threaded cap with a rubber or silicon O-ring, and provided you can secure the cap easily under cover of the wiping action with the silk, one may use that as well. If such a unit can be found or devised, the need for sponges or slush powder is eliminated.
As for the references to finding the commercial magic props used in this routine, they are as follows:
The crystal goblet I use has been in my collection for a long time and was made by Mak Magic using a real Mikasa brand crystal goblet. As far as I can tell, as of this writing it is available here: http://abbottmagic.com/Mirror-Goblet-Crystal-P1346.htm
Because of its nature, you can get a nice clinking sound out of this crystal goblet from the stem or the empty side of the goblet using a pen or other non-metal object.
The other great options that would work just as well can be found here: http://www.stevensmagic.com/index.php?main_page=product_info&cPath=103_39&products_id=112413
And here: http://dennymagic.com/store/mirror-glass-pro-by-bazar-de-magia-trick-11821.html
The goblet sold by Stevens Magic and the glass sold by Denny & Lee are both made of plastic and are not nearly as fragile as the crystal goblet. I do use the glass made by Bazar de Magia from time to time and it is very good for the price too.
You can find the Double Shot gimmicks (along with the Show Doctor book!) here: https://www.magicalwisdom.com/shop/p/street-magic/double-shot
If desired, you can use mirror glass/goblet for the production of the liquid and use In The News (made by Tenyo and available at www.dennymagic.com) for the vanish and reproduction. Jeff and Abbi McBride use In The News a lot and it has been a standard in their act for years. It is easy to do, it is low-priced and it always gets great reactions!
Another thought: You can just as easily vanish the liquid without the pull by covering the goblet with the silk once more and rotating the goblet under cover so the empty side faces the audience once more, essentially reversing the actions as use for the production of the liquid in the goblet, then go into the reproduction using Double Shot. This also looks very magical because the disappearance of the liquid is as instantaneous as its appearance, but in my opinion it is not necessarily as strong as using the pull because the liquid never leaves the goblet or glass. That is, unless you drink a bit of it before vanishing it…
*I use orange juice for two very distinct reasons. First, the juice is more of a yellow color, which is the most visible color in the spectrum, it really pops from the stage and is very visible to people in the back of the house. The other reason is that it is readily identifiable as orange juice. When performing corporate or trade show functions for large companies and/or their executives, I prefer not to look like I have/had been drinking alcohol, especially if the event is also dry by choice.
**When I say minimum capacity, I mean that it is filled to the point where there is still a good 1.27cm (½ inch) or more of space between the liquid and the cap. No need to overdo or overfill it.
***You can also substitute slush powder for the sponge if you so desire as long as it will work with the liquid you are using, though it is messier to clean-up after.
****For what little trouble and effort it required, why did I go about making my own water pull device? Because I wanted one that held a larger amount of liquid than most commercially available water pulls of the past. If you do not want to go through all the motions of making your own, or if you are not particularly handy, you can use the water pull manufactured by Vernet, found here: http://dennymagic.com/store/water-pull-vernet-15833.html - just keep in mind that the Vernet pull holds essentially a few drops of liquid in comparison to the one I describe above, but it is still a great product. In the grand scheme of this routine, if you decide to opt for the Vernet pull, you are better off skipping the pulls altogether and going with the In The News vanish and reproduction.